Wednesday, June 8, 2016

The Doors

The Doors was a 1960s rock band.  I don't think I'd ever consciously listened to any of their music until sitting here writing this, but whatever.  Not my genre of choice.  Apparently the dumb-sounding band name was a reference to the title of an Aldous Huxley book which was in turn a reference to some nonsensical William Blake quote.  This weird chain of reference kind of fits the theme of my house blog in a weird sort of way.

Hmm, I wonder if anyone has listened to The Doors in my house before?  This doesn't seem like the kind of place where teenagers would have rocked out in the 60s.  But perhaps some elderly housecestor of mine was a fan of The Doors and turned on her record player really loud when she was cleaning the bathroom (because cleaning a bathroom with music > cleaning a bathroom).

Anyway, don't you hate it when you get halfway into a project and wish you'd never started it, but it's too late to retreat?  Yeah... Note to self, for future reference: refinishing old wood doors is a miserable activity.

When I moved into my house, there was an old wood door sitting in the laundry room not attached to anything.  I think it was formerly one of the exterior doors to the house.

There was no door between my kitchen and my bedroom, but there were hinge cutouts, and the old exterior door very nearly fit the space, so I hung it there.  It was a little weird because it has a window in it, but it worked.  I even had a handyman plane it down to make it fit in the space exactly.

The door had about 500 layers of paint on it and lots of dings and scratches, and the top layers were peeling off the lower ones, so of course I thought to myself, "wouldn't it be a really fun project to strip this door down and refinish it!?"  Yeah, so I thought

I took the door out to the garage to strip the paint off.  I had been led to believe that chemical paint stripper would make this job easy.  Uh...no, not really.

Chemical paint stripper has the consistency of jelly, and you brush it on and let it sit for about 15 minutes.  It makes the paint all bubbly, and then you scrape it off with a scraper, theoretically.  In reality, the paint gets all bubbly and sticky and gooey, and you scrape really hard, and some of it comes off, and it makes a huge sticky gooey mess.

I discovered the hard way that it's definitely worth paying attention to the recommended temperature range.  The first day I tried it, it was too warm, and the paint kept re-drying and just didn't want to come off.  It worked noticeably better when it was cooler.

The upper latex paint layers came off reasonably well once I had gotten the trick of it.  The lower layers, which I presume are oil-based primer and top coats, didn't really want to come off.  I didn't worry too much about those, since they seemed stuck fast.

Once I was done scraping, I washed down the door with dish soap and a course brush because I didn't really know what else to do.  Then I hosed it down and wiped it dry.  This seemed to work okay, but it was really messy.  All of it was horrendously messy.  Eew.  But at least the hard part was over, mostly.

Once the door was good and dry, I used my power sander to smooth it out really nicely.  This was the only enjoyable part.  I love power sanding.  Rawr!

I then spent an excruciating amount of time chipping the remaining paint out of the decorative curvy parts and little cracks and then carefully hand sanding those parts smooth.  This was horrible, but it turned out pretty nicely.

A coat of primer and two top coats (using a paint roller, yay!), a neighbor to help me take it back inside and hang it up.  In went the beautiful glass doorknob by dad found in a junk shop in Mississippi somewhere.  And yes, the doorknob plate thingie still has paint on it.  A project for another time.

Done!

This was a really annoying job, and while I was doing it, I was really sorry I had taken it on at all.  But I'm very happy with the results!

I'm never doing that again.

Thursday, March 17, 2016

Rigor mortis kitty

Most days, homeownership is pretty great.  Then there are the days when you discover a dead cat in your crawl space...

I noticed one day that my house didn't smell too good.  It smelled faintly of dead animal or rotting fruit, but I couldn't locate a source, and it wasn't very strong.  The smell got worse over the next few days, until it became distinctly "some animal is definitely dead" and "it's definitely dead somewhere over here near the back of the house".

I looked around inside the house and found nothing, thankfully.  I figured whatever it was must be in the walls or outside, but it didn't really smell outside.  Finally, I walked around the side of the house, and lo and behold, the crawl space access panel was lying on the ground, leaving the crawl space open.  A look inside with a flashlight revealed a very stiff and bloated dead cat.

I knew which cat it was, too.  I really like cats, in general, but this particular specimen, even when not dead, was not a likable one.  It was a feral cat with nasty matted long hair and a blind eye that lurked around my yard and gave me dirty looks.  It, or the local raccoons, must have managed to claw the the crawl space access panel out, and then feral kitty went under the house to expire in private.  Poor kitty.

So I now knew the source of the dead animal smell, but not what to do with it.  I called the City's animal control department, and they said they could pick up dead animals in the yard but not if they were in, under, or on top of a house.  They gave me the number for a wildlife specialist (Lowell's Wildlife Removal), who I called to come take care of the cat.

Lowell put on his tyvec suit and dust mask, wriggled around in the crawl space, and bagged and extracted the cat.  It was stiff with rigor mortis, and very bloated, but not yet oozing.  No maggots.  No under-house soil removal was necessary.  Eew.

No photos today.  I'm sparing you the photos.

Oh yeah, and the crawl space access panel is now screwed shut.

Wednesday, February 24, 2016

A non-imperial energy audit

Lois McMaster Bujold's sci-fi/space opera book series The Vorkosigan Saga is at the very top of my list of favorite works of fiction ever.  Each book is a combination of a sort of whodunnit related to intergalactic political intrigue and intense personal reflection on the part of the main character.  Bujold is a master of both.  Miles Vorkosigan, the main character for most of the series, is sharp as a tack.  He runs circles around everyone else while simultaneously learning life's hard lessons and overcoming a series of physical disabilities.  I really like Miles; Bujold is so good at writing characters that you actually know him well enough to really like him and to know how he thinks.
From Wikipedia

My favorite of the series is the book Memory, in which Miles, at age 30, is forced to make a sudden and unexpected career change.  Things seem to be going pretty badly for him, but they suddenly swing in a much more positive direction when he is appointed by the emperor of Barrayar to be an "imperial auditor". The imperial auditors are a small and elite group of highly trusted people with varied expertise who investigate things on behalf of the emperor and have the authority to speak with the emperor's voice in situations where consulting the emperor would take too long (like when he's halfway across the galaxy).

The title invokes instant respect and some amount of nervousness from any Barrayaran familiar with the position, but most outsiders have no idea what Miles actually does (which can work to his advantage).  For example, in Cryoburn, a young friend of Miles mistakenly assumes he is some kind of insurance claims adjuster.  It sounds kind of boring, but it isn't (nothing Miles does is boring).  It typically involves narrowly saving the future Barrayar (or the entire galaxy) from assured destruction or uncovering and tidily dealing with some outrageous plot that was spiraling out of control.

Unfortunately, most real-life auditors do things far more mundane.  Financial auditing must be one of the most boring jobs ever.  Energy auditing seems a tad more glamorous, particularly if you get to investigate a lot of old houses like mine.  You never know what you're going to find.  I recently got a whole-house energy audit (by Home Performance Matters out of Upland, CA), which, although interesting, proved to be rather less exciting than anything Miles Vorkosigan would have audited. (He would have delegated my audit to a competent underling and gone off to do something more interesting or accidentally destructive.)

Energy audits can be done with varying levels of detail.  My energy audit was a quick, general audit to measure the energy efficiency of my house and to identify ways to improve it.  For example, they measured the rate of air turnover in the house by doing a blower door test, but they did not use an infrared camera to identify exactly where the air leaks were (which, in retrospect, would have been more useful).  They also inspected all the duct work and measured the amount of airflow coming from the ducts.

They broke down potential improvements into three categories, in the order in which they recommend addressing them:

  1. Air sealing to reduce drafts
  2. Insulation to reduce heat loss (or gain) from outside
  3. Efficiency improvements to the HVAC system

After the on-site audit, they followed up with an hour-long phone consultation to go over the results and make recommendations.  They were very helpful in explaining everything and very good about answering questions.

For item 1, they noted that the house was less drafty than most of similar age (perhaps due to my window weathersealing?), but they did not have specific suggestions except replacing windows altogether and getting one of their guys to crawl around in the crawl space and caulk things.  I really wish they had identified specific places where the air leaks were coming from (besides the obvious places I know about, like the window bottoms) because then I would know exactly where to focus my efforts.  Ah well.  If nothing else, I'm inspired to try again to figure out how to seal the bottoms of the windows, and I might consider replacing the kitchen and bathroom windows, which are kind of horrible and not original anyway.

For item 2, they investigated the possibility of adding blown-in wall insulation but determined that it is not possible for my house.  Although the first hurdle (knob and tube wiring, a fire hazard) has been dealt with, they cannot do blown-in cellulose insulation because lath and plaster walls do not have a vapor barrier, and moisture from inside and outside the house is free to enter the wall cavity and will cause the cellulose to bunch up and grow grossness.  This page explains the problem pretty well.  This is a real bummer because wall insulation would make a huge difference in my comfort level.  When it's cold outside, my walls are cold.  When it's hot outside and the sun is beating down, as it so often is here in SoCal, my walls feel like an oven.  Hmm, time to plant some shade bushes.  But then I'd have to water them...

For item 3, they noted that the air intake for the HVAC system is undersized.  They also found that there was some leakage in the duct work and that the air wasn’t distributed optimally.  They would be happy to re-do all the ducting for $4000.  Uh, no thanks.  It’s not worth it given what I pay in utilities (practically nothing).  I will ask my HVAC people to check the duct sealing next time they come to service my equipment, though.

Ultimately, I don’t think this audit really told me much I didn’t know already.  I already knew the house was drafty and poorly insulated.  Now I have specific numbers to back it up, and I also have some possibly-useful information about the exact age and models of my HVAC equipment and a more accurate square-footage measurement of my house.

Blahhhhh.  Maybe I should give up on this old house and take up residence on a space station somewhere (preferably not a drafty one).

Tuesday, November 24, 2015

The many types of drafts/draughts, and how I got rid of a few

This post is about my latest attempt to reduce drafts in my house.  While trying to think of some random historical tidbit to include in this post, it struck me that the word "draft" (or sometimes "draught" in British English) means an awful lot of different things:
  • Currents of cold air flowing through your house and making you chilly
  • The intentional flow of air (and smoke) up a chimney
  • A preliminary version of something you're writing or creating, like a rough draft
  • A bank draft, an order to take an amount of money from an account
  • "The draft", people getting conscripted into the military, or a sports team
  • The depth of a ship's hull under the water (and also a measure of the curvature of a sail, for some reason)
  • Beer or cider from a large container like a keg rather than individually bottled
  • A horse or other animal that pulls heavy loads
  • Draughts, the game of checkers
  • Drafting, making technical drawings
  • A political draft where supporters attempt to convince someone to run for office
  • An angle of taper for a mold or cast used in manufacturing to make it easier to get the manufactured item out of the mold
  • Campdrafting, an Australian rodeo sport (probably called that because it involves draft animals)
What on earth do all these things have in common? The word comes from Middle English meaning to pull or draw something in.  Aha!  Cool!  A lot of these things do have to do with pulling: air being pulled through a crack or a chimney, a ship's hull being pulled down into the water, a draft horse pulling a cart, the military pulling in people to serve, pulling beer from a keg, etc.

But a rough draft of a paper, or a technical drawing?  The word "draw" comes from the same or similar origins, as it turns out, which is why to draw also means to pull (like to draw a card or a gun).  I guess maybe it comes from the act of pulling a pencil across a paper (or ink across some parchment).

Anyway, I'm still trying to make my house more energy efficient and comfortable.  Despite the new top-sealing damper on my chimney, I could still feel a draft sucking the warm air out of my living room on a cold day.  Time for another crusade for draft reduction!

This time, I really wanted to actually plug the fireplace up with a cover or something.  I was going to cut a thin board to size and glue some insulation to the back of it or something (I drafted a plan), but when I got to Home Depot, I discovered that you can buy board insulation for pretty cheap.  Board insulation is a rigid foam material that you would normally install inside your wall in between joists when you're constructing a new house.  There are different types that go in different layers, and they come in really large sheets that are $15-$20 each.  I bought a large sheet of it (which didn't fit in my car) and cut it down to fit into my fireplace.  It cuts very easily with a large utility knife, but little bits of foam cling to everything.

It was kind of hard to fit it into the fireplace.  I had to make a rough cut and then slice off slivers until it fit.  There are still a few gaps around the edges, but it's not too bad, and I can fill it up with some cloth or something.  Maybe I'll actually make a cover for it for both that purpose and for aesthetics, at some point.  It's...not very pretty.  But hey, this was a LOT easier than my original plan, which was to cut out some wood to fit this hole.

Fireplace insulating plug. It even has a handle!


Floor heater insulating plug, with handle.
There's a hole in my floor where there's an old floor heater that's no longer in use.  I can feel a draft from that hole, and I had plenty of leftover board insulation, so I put a layer of foam in there and then taped a plastic sheet over it to make it air tight.  The metal grate goes on top.  One day, I'll get someone to remove the old heater completely and patch the floor, but that's a more ambitious project for the future and not critical.

Here's to a slightly less drafty winter!

Saturday, October 24, 2015

Though I spends me time in the ashes and smoke...

I have always loved the movie Mary Poppins.  Mary Poppins was the movie I watched over and over and over again as a kid, the one I watched so many times that it shriveled up and died in the VCR, tattered strands of tape all twisted up and hanging out of the VCR slot.

Mary Poppins was released by Disney in 1964.  At that point, my house was already a respectable 44 years old.  Geek factoid: The production used the sodium vapor process for the combined live-action and animation scenes.  I love how the Wikipedia article on the sodium vapor process says it's very simple in principle, and then proceeds to describe it over several rather complicated paragraphs.  Basically, it involves illuminating the live-action stuff with a very specific wavelength of light and a bunch of other wizardry for combining that imagery with other footage.  Disney used this process a lot and the 1960s and 1970s.  It could be done with more precision than bluescreen and also did not pose limitations on makeup and costume colors.  The Mary Poppins team won an Academy Award for their use of this technique.

Mary Poppins depicts London in 1910 ("It's grand to be an Englishman in 1910. King Edward's on the throne, it's the age of men!"), at which point they were probably burning coal in their fireplaces (blech!), sending plumes of grossness through their chimneys to "up where the smoke is all billowed and curled".  This was 10 years before my house was built, and I'm actually not sure if coal ever would have been burned in my fireplace.

Anyway, I just had a chimney sweep come and work on my chimneys!


Chim chimminy, chim chimminy, chim chim cher-ee, a sweep is as lucky as lucky can be...sort of.

The cold season is coming on (kind of...as I write this, it's about 90 degrees outside), and in my endless quest to reduce drafts in this old house, I decided it was time to deal with the chimney.  It didn't have any kind of damper or cap on it; it was just open to the sky.  Consequently, rain comes in, and heat goes out.  Plus, I'd never had it cleaned or inspected for problems.  I have no intention of actually burning anything in it (because why?), but I thought it would be a good idea to make sure it wasn't going to, you know, fall over or something.

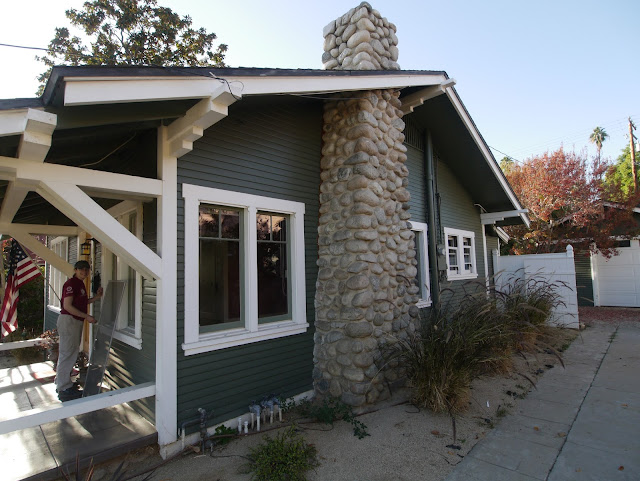
The main chimney (there's another one for the stove vent) is made of river rock that somebody in 1920 probably just went and picked up from the Santa Ana River wash (which you certainly aren't allowed to do anymore).  It has a lot of character, and it matches the chimneys and adornments on a lot of other craftsman-style houses in my neighborhood.

My river rock chimney. Photo Copyright 2013 by Andrew Morang
I had a chimney sweep come and give my chimney a complete inspection and cleaning, and he also installed a cap and a damper.  (He did wear a top hat, but he swapped that out for coveralls and a respirator when he was actually cleaning.)  He said the everything was in great shape, although overdue for a cleaning.  But, we had some problems with the damper that he didn't notice initially, and I had to get him to come back to fix it.

Clean fireplace
A top-sealing damper is a clever little device that sits on top of the chimney and can be open and shut as desired via a pull chain or lever inside the fireplace.  When shut, it clamps down over the chimney hole to keep warm air from escaping.  If you're going to burn a fire, you open it to let the smoke out.  This little assembly sits inside a cage with a roof over it to keep animals and rain out even if the damper is open.
Chimney cap with top-sealing damper

Damper pull chain
Unfortunately, the damper didn't seal adequately after the initial installation.  Most chimneys are flat on top, but mine slopes outward.  The damper seal kind of hung out over this sloping part, leaving an air gap underneath.  Also, the damper lid, when closed, was misaligned with the damper seal.  When I went up on the roof and discovered this, I was very disappointed.  Bummer.  Had to call the chimney sweep, have an awkward conversation, and ask him to come back to fix it.  At least he was extremely nice and professional about it.  It was also really helpful that he was technological enough to receive photos of the problems by text, so he immediately understood exactly what I was talking about.

He came back and fixed it, and this time I went up to the roof with him to inspect it.  I should have done that the first time.  Lesson learned: Suck up the awkwardness and inspect the workman's work while he's still there.  Better to catch the problem immediately.

Damper problem #1 - air gap under cage
Damper problem #2: Misalignment with seal
Check your workmen, step in time, check your workmen, step in time, never need a reason, never need a rhyme, check your workmen, step in time!

Hollywood doesn't make movies with dance scenes like this anymore...

Tuesday, October 6, 2015

Oh, rot! My windows are decaying...

Rot.  "Oh, rot!" is a slang expression meaning "Nonsense!"  Rot is the name of a tributary to the River Danube in Germany and also the name of a village in Sweden.  Unfortunately, it's also something affecting the windows in my house right now.
Charming window

Recall that my house has charming but slightly weird inward-swinging casement windows.  Although the insides and outsides of these windows have been painted 8000 times, nobody ever bothered to paint the top or bottom of the swinging frame.  Consequently, the wood has been exposed to the elements for 95 years.

At some point, I noticed this fact, particularly that the bottoms of the windows were in pretty bad shape.  I thought I should put a coat of primer paint on them just to keep the protected, but when I started prepping them for that, chunks of wood kind of fell out, and I realized that they needed a lot more attention than a quick coat of primer.  Yay, my windows have dry rot.

The bottom of one of my windows, in very bad shape.
True dry rot is caused by fungus that grows in the wood and basically eats it, breaking down its structure.  The wood becomes soft, cracked, and brittle.  I don't know for certain if my windows actually have true dry rot, but they certainly have the symptoms.

So of course I had to fix the windows.  I purchased a handy-dandy dry rot repair kit on Amazon which contained all the necessary ingredients.  The procedure went something like this:

  1. Take the window off its hinges, put it in the garage, and use a utility knife and pokey tool to remove all the wood that wanted to come out.
  2. Liberally brush on some wood hardening liquid to the exposed wood.  This stuff is great.  It soaks right in (my windows literally sucked it up) and makes the wood nice and hard and a little shiny.  It's almost like a very thin water-based varnish, and supposedly it kills fungus.
  3. When the first coat of wood hardener is dry, brush on a second coat for good measure.
  4. Let the wood hardener dry for a day.
  5. Fill the holes in the wood with an epoxy-based wood filler.  The stuff that came in my dry rot repair kit came in two tubs.  One looked just like peanut butter, and the other looked rather less edible.  You daub out equal quantities of each and mix them together, and then you have about 20 minutes to work with it before it becomes too tacky.
  6. Let the wood filler set for 24 hours.
  7. Sand down the areas you filled to make the surfaces nice and smooth.
  8. Thoroughly vacuum the windows to clean up all the dust you made while sanding.
  9. Prime paint the exposed wood and the newly-filled areas.
  10. You could put a top coat of paint on if you want to, but I'm not going to bother right now because the windows really need to be refinished anyway.
Wood filler, after sanding it down.

After prime painting
This project has taken me a while.  I got started in July, and I still have 2 of 13 windows to do.  I can do at most three at a time (based on time and space limitations).  Plus, I have to do it when the weather is nice enough for me to remove the windows for a while.  I ended up doing a lot of taking windows down and putting them back up.  Once the wood filler was dry enough, I could put the windows back up to let them set and then take them out again when I was ready to sand and paint.

Painted-over window hinge
Another slowdown was the fact that 4 of the windows had stuck hinge pins.  Like the insides and outsides of the windows, the hinges have been painted 8000 times, which is not particularly conducive to operation.  Thankfully, although I procrastinated on the stuck windows for quite a while, they did not turn out to be all that difficult to unstick.  I just squirted them with WD40 and then pried the hinge pins out with a tiny screwdriver.  I wedged the tiny screwdriver under the pin and banged on it with a hammer.  I then cleaned the hinge pins with more WD40 and some steel wool, and I'll lubricate them with something before I put them back permanently.

Ultimately, I'm not sure how much life these windows have left in them.  They are all operational, and I think my repair will hold for some time, but they really need to be refinished and re-puttied, some of them need their hinges reset, plus they are old and drafty.  And they have lead paint on them, which means that refinishing them will be a little complicated.  Is it worth expending this effort, or should I replace them entirely (probably at considerable expense)?  I like their historical charm, but I also like energy efficiency and reliability.  I'm not sure what to do and will have to think about it.

Saturday, August 15, 2015

A-Plumbing I Did Go

I have been an appreciator of The Three Stooges for about as long as I have been an appreciator of old houses.  Their slapstick routines hold plenty of appeal for a small child, but their gags have a lot in them for grown-ups, too.  Through their satire and parody of the era in which they performed, you get a fascinating glimpse into what life was like in 1930s and 1940s America.

Widely regarded as one of their best film shorts, "A Plumbing We Will Go" (1940) shows the chaos that ensues when the Three Stooges accidentally end up as plumbers trying to fix a leak in a "high society" house.  Water ends up everywhere, including the electrical system after Moe and Curly hook up some electrical piping to the plumbing system.  When the wealthy homeowner shows off her new television set (a novelty in 1940) to a group of friends, the broadcast of Niagara Falls suddenly turns into a gushing stream of water that bursts through the TV screen and all over the guests.


The Three Stooges - "A Plumbing We Will Go" (1940) from daniel lansing on Vimeo.


A-plumbing I did go the other day, and while I think I'm a bit more of a competent plumber than Moe, Larry, and Curly, I did end up having to call a plumber to get me out of a spot of trouble.

 I was a-sitting on the toilet when...(every good story should start with "I was a-sitting on the toilet when", don't you think?)

I was a-sitting on the toilet when I heard that ominous sound: "Drip...Drip...Drip"  It was a-coming from the cabinet under the bathroom sink, that darn vanity that I've had so much trouble with.  This time, it wasn't the seal around the edge of the sink.  It was the plumbing.  So I a-took all the stuff out of the cabinet, engaged in advanced geometric maneuvers to take the drawer out, and a-popped out the Dumb false drawer front panel. (I'm very glad I installed those handy little plastic clips on that thing for easy removal.)  There was water all over the place.

Preview photo, so you have some idea what I'm talking about. That shiny brass connector is the one I installed (successfully).
The sink has two connections to the water pipes in the wall, one for cold and one for hot.  On both sides, to span the distance between the sink faucet and the water pipe in the wall, two lengths of hose were used, connected by a little threaded hose connector piece, presumably because a single hose wasn't long enough.  On the cold side, that little threaded connector piece was corroded, and the joint between the two lengths of hose was dripping.  Okay, well, that's not too tricky to fix if you're a do-it-yourselfer.

The first thing to do, obviously, is to shut the water to the sink off so it doesn't gush everywhere while you investigate things.  There are two shut-off valves under the sink (one for cold and one for hot) so that you can shut the water to the sink off without turning off the water to the entire house.  The cold water valve (the one I cared about for this repair) did not work.  The handle didn't want to turn, and when I a-cranked on it with a wrench, it made an ominous creaking noise and turned around but did not diminish the water flow at all.  Hmm, I guess I need to a-shut the water to the whole house off after all.

Curly has been sent to shut the water off while Moe and Larry wait in the basement to fix the leaky pipe, but they've been waiting a while, and the water is still dripping.
Moe: "I wonder why that egghead don't shut the water off."
Larry: "Hey, I saw a guy shut the water off once in the front yard."
Moe: "When I want your advice, I'll ask for it.  Hey, go out in the front yard and shut the water off."
Larry proceeds to dig an enormous trench in the front yard and never does manage to shut the water off.

The water shut-off valve for my house is in the front yard (in a straight line from the water meter, which is under a little metal cover next to the street curb).  There's a whole mess of pipes where the shut-off valve is that doesn't make a lot of sense.  Something to do with one of the several old sprinkler systems in the yard.  Later, when I a-showed the shutoff valve location to the plumber, he gave it a puzzled look and said something like "It looks like you have a pretty unique configuration here."

All right, shutting the water off to the house would have allowed me to fix the drip successfully, but since I'm kind of anal retentive and like to do things right, I thought I should probably replace that faulty sink valve in addition to the drippy hose connector.  I think this is where things started to go badly.

[Trip to Home Depot. Stare blankly at the dizzying array of valves before getting the plumbing expert on staff to point at the right one.  New hose, new connector, new valve...check.]

I a-put in the new hose and threaded brass connector with no problem.  I made sure to wrap the threads with Teflon tape to ensure a good seal.  That part was quick, easy, and effective.

Then I a-tried to put in the new valve....

The threaded pipe connector emerging from the wall was in bad shape, so bad that I had trouble getting the new valve to screw into it.  I a-wrapped it in Teflon tape and finally managed to get the valve on, but when I a-tested it, it a-dripped.  I undid it and redid it, and it still a-dripped.  I screwed it on tighter, but it still a-dripped.  Uuuugggghhhhh.  Time to a-call a plumber.

Anthony from All City Plumbing was prompt, polite, competent, and efficient.  He came the day I called at the appointed time, thoroughly explained the problem and what he was going to do to fix it, and fixed it immediately.  Great customer service, especially compared to some other contractors I've dealt with!  (He told me that contracting school does not teach you any business or marketing skills, so there is little wonder that many contractors struggle running a business, no matter how good they are at their trade.)

So what did Anthony have to do?  He took out the valve I had installed, and confirmed that indeed, the threaded connector thingie (called a "nipple") coming from the wall was in bad shape.  He tried to remove it, and it imploded under his wrench.  He couldn't get it out of the 90-degree elbow pipe connector in the wall, so he had to hack apart the wall to remove the 90-degree elbow from the wall pipe.  Even before I called him, I was afraid that this was about to start spiraling out of control.  I was afraid I was going to have to get the house entirely re-plumbed if each successive piece of pipe proved to be corroded.

Thankfully, the pipe in the wall looked to be in excellent condition.  The threads were solid, and it was just the 90-degree elbow and the threaded nipple that needed replacing, and that was done in no time (and at minimal cost...for plumbing work).  Thanks, Anthony!  Now I just have to a-put the wall back together.  Oh joy!

The pipe imploded. The silver thing is the back end of the plumber's wrench propped in there to prevent further collapse.
The plumber's handiwork.  No more dripping.  Nice new hole in the wall.


Lesson learned (and, in fact, explicitly stated by the plumber): If you live in an old house, if it ain't broke (or even if it's a little broke), don't fix it.  If the valve doesn't work but it's not actively leaking, it's probably better to just leave it because as soon as you take it off, suddenly your entire plumbing system needs replacing when it would have been okay for a good while yet if you had just a-left it alone.

Nyuk, nyuk, nyuk.